
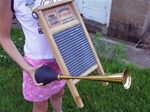
Do-it yourself bells and more for your musical washboard.

When I first started to play the washboard there wasn’t much information to be found on the web about how to add extra sounds to a washboard. Since I don’t live in an area full of renown washboard players to try and learn from, but am not to shabby at doing stuff myself, I decided to make a page explaining how I had put a cymbal or bell on my board.
However I should warn you that there are as many ways do do this as there are washboard musicians, which is pretty unique in the instrument world. And also that although I first imagined myself with a washboard covered with all kinds of cool stuff, as I learned to play and found my own style I realized that I actually prefer not having that many extra sounds to use.
But still, I truly love washboards. What other instrument encourages you to modify it however you want? And this page may hopefully still help encourage folks to give washboard playing a try.
So don’t hesitate to experiment. It’s your instrument, fine tune it to suit your needs!
It also would be cool to hear whatever tips and advice you care to share so don’t hesitate to comment.
Table of Contents
- The Sound Of Metal
- Uh-oh, split wood!
- The Columbus Washboard Company
- Attaching a Bell
- Drop-in Anchors – 4 Prong T-nuts
- Bulb horns and a way to avoid drop-in anchors
- Clamps
- Stick stuff on with magnets
- Bone Dry Musical Instrument Co
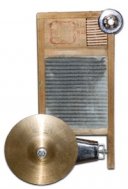
- Attaching a cymbal
- Do-it Yourself Bathtub Drain Plate Bell
- Attach A Strap?
- Washboard Links
The Sound Of Metal.
Washboards aren’t all made out of the same metal or material, zinc, brass and stainless steel are often used and even glass, and of course they don’t all sound the same.
You can also get different sounds from your washboard by using different materials to tap and scratch it. A wooden spoon will not sound like a wisp, and even thimbles made from different metals sound well… different. But washboards made of different metals also have very distinctive sounds:
These three recordings where made in the exact same conditions, and need to be updated…
Uh-oh, split wood!
On the first Zinc King #703 I bought, I added a bell, cymbal, bathtub drain plate bell and a small home-made woodblock. These are small washboards and since they are old have been used to wash clothes the wood can be very dry and brittle and then is very easy to crack and split!
This is true for most old washboards (and many new ones made in soft pine) so think twice about your do-it yourself skills before attempting anything. And if you do decide to add something, be extremely delicate: for instance drill small holes first and enlarge them bit by bit.
The Columbus Washboard Company.
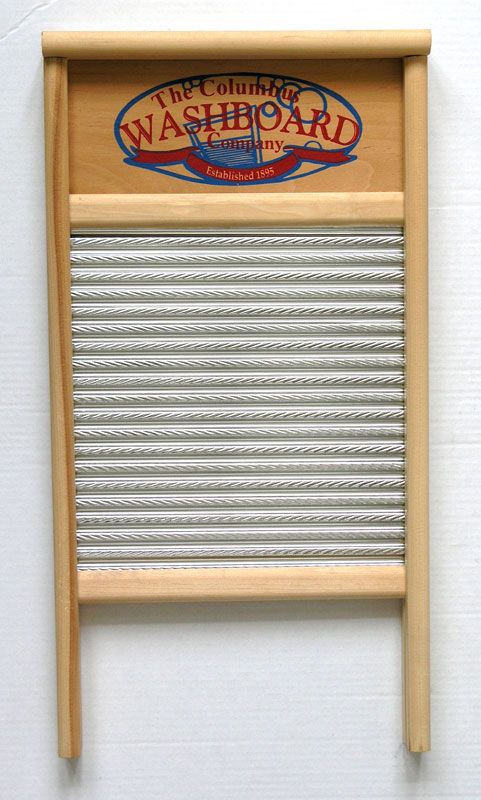
Established in 1895 when Frederic Martin Sr. started building washboards in his backyard for resale the Columbus Washboard Company is more than well known to musical washboard players.
Visiting their website is a must for anyone who is interested in soapboards, it presents their products, both musical and not, some arts & craft washboards and the company’s history.
10 years ago they moved from Columbus to Logan, Ohio. Here is a short article with an interview of co-owner Jacqui Barnett (below the fold), from Entrepreneur.com, recounting the move.
These are great washboards! The one that have a spiral crimp profile have a very smooth surface to tap and scratch and a distinctively sharp sound.
*BTW: Beware that it seems there are Chinese made washboards that are also named “Authentic Musical Washboard “. I have read that they are made of an inferior wood and have the words “ Authentic Musical Washboard “ printed in brown ink on both sides instead of having the Columbus Washboard brand name, phone and email printed on the back.
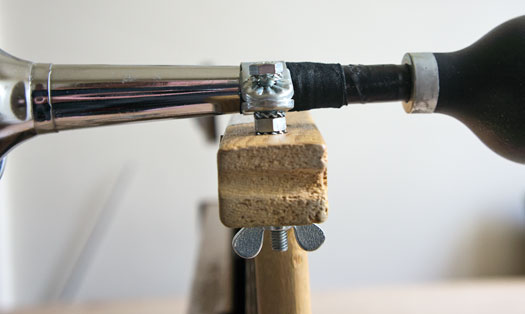
Attaching a Bell.
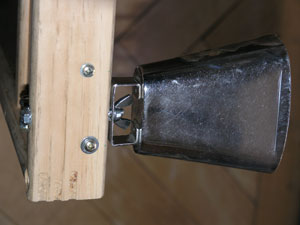
It’s not hard to put stuff on your washboard, especially if you have a few power tools lying around. Just remember to use all the necessary protection!
Here’s a bell attached with a wing nut that I was able to fit in the space between the bell and its “handle”, but you could very well have the wing nut on the opposite side. Two lock washers help preventing the bell from turning too much.
If you have a bell from a drumset, you will be able to use ..
4 Prong T-Nuts.
And a dab of glue!
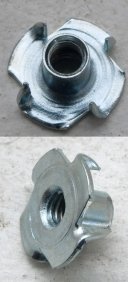
A good way to bolt something on to a piece of wood is use a 4 prong T-nut. They have little spikes that prevent them from rotating when you screw in the bolt but watch out that you don’t split the wood while hammering them in. If necessary drill 4 tiny holes (smaller than the spike’s width) where the spikes will go.
A little glue to hold them in place is not a bad idea.
Bulb Horns.
You need to drill a hole so figure out the best place to put it first..
I first drilled a hole that corresponds to the size of the bolt. Since this Bulb horn came with a accommodating “handlebar clamp”, all I needed to do was find a bolt that was long enough to go all the way through and leave enough room to tighten with a wing nut.
So: The bolt goes through the “handlebar clamp”, then I put a spring lock washer since it will help prevent the horn from moving too much, these are tightened with a nut to hold the horn correctly, then I put a thick spacer washer to put space between the horn and my washboard. And don’t forget to add a washer before screwing on the wing nut.
Washers against the wood will help reduce the risk of cracking it!
There don’t seem to be that many bulb horns on the market so if you want one you either need to search garage sales and antique shops or make life easy and order one from somewhere on the web (See Bone Dry Musical Instrument Co for instance). Back when I got mine, it took some searching to find them in Europe. Hint: In France, Germany and Switzerland they can be found on websites specialized in items for dogs.
Clamps.
Don’t want to drill holes in your board?
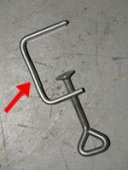
Beware that I have yet to actually try using clamp, however you can see enough pictures of washboard that do use clamps to attach stuff that it’s surly possible.
The issue seems to be attaching stuff to the clamp. I think I would start by drilling a hole on the side marked by an arrow in the picture and using it to bolt your cymbal or horn (for instance).
Stick stuff on with magnets.
A Plexiglas woodblock for instance
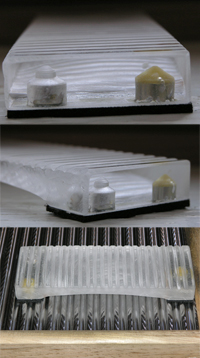
Magnets don’t stick to my old Swiss or Zinc King washboards but they do on the stainless steel one bought from the Columbus Wasbboard Company!
I think that it would be fun to have a variety of stuff that could quickly be stuck on for a song or two and since it’s “back side” is open, these could be easily stored there (if you see what I mean).
My plan here was to make a woodblock with a rimmed profile but I couldn’t find the a piece of wood that had a good shape for what I had in mind, I did have a chunk of Plexiglas however and figured it would have to do.
A word of caution: If you don’t know what you are doing: Be very, very careful! Plexiglas gets everywhere when you cut, sand and grind it and can be sharp. Eye protection is a must and not just your normal glasses, you really need something that protects your eyes from all sides as well as heavy clothes and gloves. Your tools should have all the adequate protection guards too! And BTW: Plexiglas will melts if overheated.
This is really just an example of how magnets can be useful, I could have just as well been made it out of wood. But Plexiglass does make good looking pictures! ;-)
As you can see, I grinded out a bridge shape to get a sharper sound. Filed the ribs, and drilled holes in which I epoxy glued three strong (Pull force 15 lbs) rare earth magnets. I added a layer of foam to reduce vibrations which also somewhat reduces the strength of the magnets, making it easier to remove.
The downside of this idea is that if you use steel thimbles, brushes, spoons or a wisp to play they will stick to the magnets too; funny but not very convenient. But it can be useful if you play with nylon brushes or other none magnetic materials.
Dry Bone Musical Instrument Co.
This shop is specialized in Rhythm Bones but Scott is also constantly scouring the planet for Zinc King Lingerie Washboards, #703 as well as a few other kinds of National scrubbords. Unfortunately these are getting expensive as the get harder to find but depending on your playing style it might be worth it.
They also carry a great selection of fantastic looking bulb horns, cowbells and vintage tin cups from the turn-of-the-century not to mention a growing selection of thimbles made out of different metals, horn and even wood. So you may want to check out their Musical Washboards & Accessories section.
Ps: I not affiliated with this shop but Scott is a friend, plus I’ve ordered stuff from him and know he offers the best possible service.
Updated Sep 2013 to add: FYI, they now have two kinds of bottle cap washboard gloves: air mesh and leather!
Attaching A Cymbal.
Cymbals can be a lot of fun!
If you know a drummer you may be in luck because they often have old equipment lying around. Otherwise small cymbals are easily found at music stores or ebay. Unfortunately, they often cost more than washboards.
There are certainly many ways and places to attach one. Just keep in mind to make sure it doesn’t get in your way. A traditional spot is to place it on the top left (or right) corner of the board, but it goes just as well on the bottom or stuck out in front; there are many cymbal holders in your favorite store’s drum hardware section that could be rigged up to have your cymbal horizontally out in front.
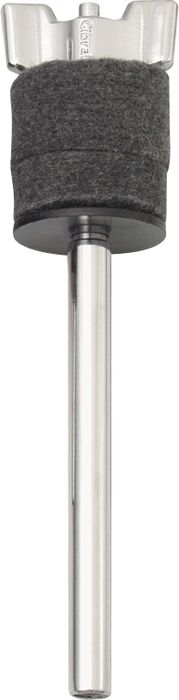
The easiest way to attach a cymbal is with a Mini Cymbal Stacker like the one in the picture. They come in both 4” and 6” height and are made to screw onto existing 8mm cymbal tilters. (6” model provides approximately 4” clearance between cymbals while the 4” model provides approximately 2” clearance.)
I often use the 6” one but have never tried the 4”.
You will need a metric 8mm bolt sticking out of your washboard at the place you would like it to be attached.
If you want to do it your self, keep in mind that for a cymbal to sound good, it needs to be held between two peaces of thick felt. I once used the felt of of some old chair leg felt glides which worked fine. Sliced them off and put a hole through them big enough for your bolt.
I put a washer (not quite as wide as the felt), a piece of felt, the cymbal, a second piece of felt, another washer. It shouldn’t be too tight. I then used a hex coupling nut to screw it on to the nut I had coming out of the washboard. It had a tendency to become unscrewed, so perhaps a better way would be to use a 10” – 12” bolt, a 4 Prong T-Nut on the board and lock nuts on either side of that.
BTW: You can attach the cymbal “upside down” to gain a little space if needed, and also hit it from underneath by flipping your hand up!
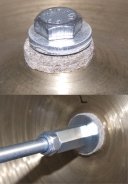
Do-it Yourself Bathtub Drain Plate Bell.

Bathtub drain plates have different shapes, sizes and sounds. Put chimes on your washboard with a few well chosen ones!
The upper overflow drain plate of old bathtubs can make a very clear sounding bell.
All you need is a hex bolt that fits through the drain plate and that is long enough to be attached to the board as well as give the bell the desired height, two metal washers, two rubber washers and two lock nuts that fit the bolt.
Put a metal washer, a rubber (or felt) washer, the drain plate, a second rubber (or felt) washer and a metal washer on the bolt. Tighten them with a lock nut, just enough to prevent rattling but not too much or you will lose ring quality.
If your washboard is made with pine, you may want to use a 4 Prong T-Nut or a wingnut to attach it. Since mine is made of hard beech wood I just drilled a hole (slightly smaller than the bolt) and screwed it directly into the wood (on the side of the left washboard foot). The second lock nut is to adjust how high the bell is by preventing the bolt from screwing in too far.
Listen: Bathtub drain plate bell sound file
Attach A Strap?
“I recently bought a zinc king and was wondering what the best way to add a strap is? It seems that the wood is quite delicate I don’t want to crack it.”
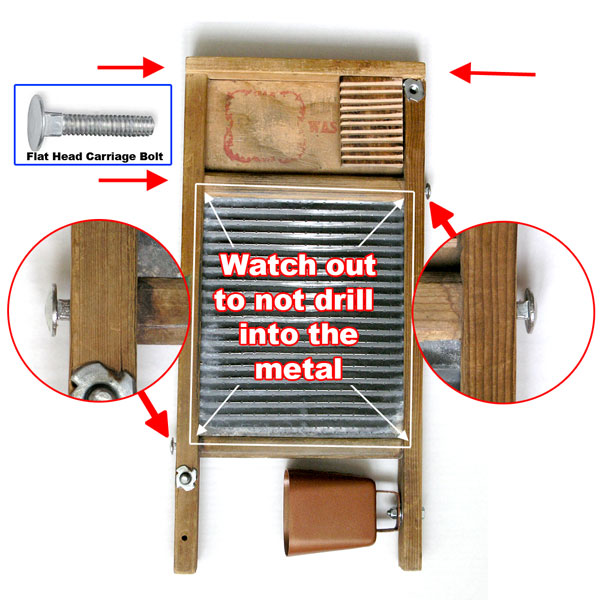
First of all like everything else on this page, this is a suggestion on my part and not necessarily the best way for you. I don’t like hanging things around my neck but if you are just using a small washboard, two eye screws and some thick or braided string attached to the top of the board may be all you need. The other extreme would be something like backpack shoulder straps that would hold a heavy and very jazzed up board in front of you.
When I first started I had a couple of guitar straps and decided to use one of them. They work fine but do make the board hang slightly askew (I now prefer putting the left bolt were the top arrow is on the left side).
There are a variety guitar strap attachments you could use but if you’re looking for cheaper solution you can just use a Flat Head Carriage Bolt. Either way cracking is an issue, so you need to be very careful! Especially on a small washboard like the Zinc King.
For the maximum strength I think it’s best to put the bolt into one of the crossbars, on the top or above or below the metal which BTW you need to avoid hitting when drilling the hole.
First use a small drill bit, then one exactly the same size of your bolt (if you are doing this to a new washboard you can make a hole that is slightly smaller and screw the bolt in but in an old dry one chances are that it can crack it). You really need to be very careful, the first time I tried the bit hit the metal and made a big hole. My solution was to mix the dust/small chips of the drilled wood with some white glue, then place the bolt where I wanted it and fill in around it with the glue wood dust mixure (let it dry overnight).
In any case you should put some glue in the hole, and then the bolt, so it holds in strong.
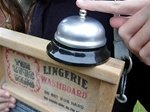
BTW: I wouldn’t recommend anyone buying a bell like the one that happens to be attach to the washboard in the picture. Either use a can or spend more for one that isn’t dependent on having a clapper. When hit with a thimble this one just clanks.
Washboard Links
Have a link to share? Please leave a comment.
- Washboards International
As the name says, the foremost site for washboard players - The Washboard Player Appreciation Society | Facebook
- The Washboard Music Festival
The Washboard Music Festival is a 3 day extravaganza held in the streets of small town America. (I’d love to get there one day!) - Art and Soul! Washboard Slim’s washboard at the Smithsonian
Need inspiration? Check out this article with a picture of Robert Young-a.k.a. Washboard Slim’s incredible washboard! - Washboards on Wikipedia
- When were washboards invented?
An interesting page tracing the washboard’s history. - Let’s Talk Antiques
A newspaper article by Nancy Russel about antique washboards. - The Columbus Washboard Company
Manufacturer, Supplier, Wholesaler of Musical Instruments and Non-Electric Scrubbing Boards and Washing Machines made in the Hocking Hills. A manufacturer of tradition non-electric clothes washboards used as a percussive instrument for jazz, rhythm and blues performances. - Show me your Washboard
tambourine21’s YouTube playlist of 20 short videos more or less showing 19 washboards from the Jug Band Fest 2007 in, I think, Tokyo. Some great jazzed up boards to be inspired from! - Zinc King Musical Lingerie Washboard, #703
Boasted as the Stradivarius of musical rub boards the Vintage Zinc King Lingerie Washboard, #703 can be found at Dry Bone Musical Instrument Co. - McKnowall’s Beaut Aussie Washboard
McKnowall’s Beaut Aussie Washboard and Washboard Whackers from Australia! - Traginer Wasboards
The Electric Washboard is the product of years of dreaming, planning and testing; this is the reason the Traginer team makes each instrument in their workshop completely handcrafted with special dedication, precision and care… - My Homemade Electric Washboards
- Key of Z Rubboards
Tee Don’s World of Zydeco. This is a great rubboard site with Instructional Video Frottoir Lessons! - L’Inoxydable
French haute couture washboards! - Strumhollow Washboards
- Washboards etc For Sale
In the UK. a shop selling Vintage, antique and used washboards among other things.
4 May 2014, 00:44
Your site (rattlebrained.org) is very slow. It takes about 45 seconds or longer to load a single page. I think it is hanging on loading something from blogpolls.com because I see it stop at that point in firefox. Our site just went though a similar problem with loading time and our host GoDaddy was able to fix it on their end. Your problem may just be something at blogpolls.com. Just wanted to mention it.
BTW, I am putting together my first washboard and found your site on a search.
Stan
4 May 2014, 07:34
Hi Stan,
Thanks, I’ll look into the slow loading time.
Great that you are getting into washboard playing, it can be a lot of fun!
-Rattlebrained
28 March 2017, 14:34
Howdee… I have had the darnedest time finding a decent ‘Sounding’ cymbal. Even top brand names don’t do it. They sound clingy, gonglike or just wrong. What’s the secret in getting that tssssst sound? I’d even go w a pan lid or small pie pan if that would work. Thanks! T.
28 March 2017, 16:36
Hi Timothy,
Thanks for your message!
I think that finding and choosing the right cymbal for oneself is really complicated and once wrote about it here: www.rattlebrained.or…
Although I’m not sure how much I can help you, I’ll give it a try..
On my washboard these days, I put a 10’‘ splash directly underneath either a 8” or a 6” pan lid. This does not give me that tsssst sound you are looking for but it does give a clanky attack that can be followed by more or less of the cymbal sound; depending on how I hit it.
(For info, I bought the 10” Sabian AAX splash used on the web after listening to a few examples on youtube. I knew it was going to be covered with a pan lid, and so the sound was less important than the size. I have been using an 8” cymbal with a pan lid of the same size, and wanted something larger so that I could hit the cymbal’s edge without hitting the pie lid; two sounds…)
All that because I agree with you: on my washboard cymbals mostly seem to sound “wrong”, and hitting them with thimbles probably has something to do with it.
Now about that tsssst sound..: If you want sizzle, you can try adding a small chain or some other rattle. This is easy if your washboard is flat in front of you and the cymbal is placed horizontally. Less if you have it hanging around your neck and the cymbal is vertical; but I’m sure there are ways..
Adding rivets to the cymbal is also a traditional way for sizzle.
As for cymbals with the tssssst.. I think you would need someone with a lot more experience than myself. My feeling is that you get more of it in certain cymbals that are mostly of a larger size, Zildjian come to mind as a brand that often seems to have it; but it can be pricey. Good luck!
Sorry for the long and not so convincing answer, hope you get something out of it. :P
13 October 2018, 00:00
I am designing a washboard instrument from an old National Brass King #801.
I’ve attached a piece of wood across the legs to attach other items, like a wooden block. When I attach items tightly to the wood (with screws), it deadens the resonance of the percussion on the item. Looking for a good way to attach things in a way where that doesn’t happen.
Looking at Latin Percussion’s Everything Rack (LP372). If I screwed the metal bar to the wood, maybe with rubber between the metal and the wood ?
Would it work better to glue rubber-to-wood then metal to rubber? Something like Gorilla Glue?
Any advice?
13 October 2018, 08:57
Hi Jerry, Yes I know exactly what you are saying, and unfortunately do not have the perfect solution. You need to insert something that will allow the woodblock to vibrate freely; I’ve tried foam, rubber, bits of thin “air tubes” from an aquarium.. they help, but I find that you always lose some of the tone.
You could try silicon, I’ve never tried gorilla glue.
That said, if you are hitting an object towards the wood surface it’s attached to, it’s not going to resonate well since it’s being muted by the surface it’s on. I do it anyway because I find it convenient, but the sound will not be as good as if the can, woodblock our whatever can vibrate freely.
Hope that helps.. :P
30 September 2021, 19:03
When attaching various items to my washboard, I discovered that the nuts I used would vibrate loose pretty quickly. A dab of clear nail polish on the threads at the nut will take care of this.
30 September 2021, 22:25
Hi Seane,
Good tip!
Thanks
30 January 2022, 19:26
Adding a lock washer with the regular washer under the nut can help prevent loosening.
30 January 2022, 21:25
Hi George,
Thanks, also a good tip!
17 May 2022, 02:32
Straps: You said that a guitar strap makes the washboard hand askew??? It should work exactly the same as string, a belt etc.
Attach guitar strap as you showed, adjust to length, and then slip over your head, the washboard will hang properly not askew.
17 May 2022, 18:08
Hi Mike,
Well I both agree and disagree.
I wrote “slightly askew” which IMO is not worth arguing about, but in my case has always been true. FWIW this is perhaps because I have a bad back and don’t stand as straight as I should.
In any case thanks for stopping by and leaving a comment!
10 June 2022, 18:28
Hi. I’m just now arriving at the washboard table, awaiting my first vintage boards. Regarding adding straps — could they not just be attached with self-stick Velcro strips? Stick one side of the strip on the board, the other on the fabric? Might need to use do-it-yourself straps, or the leather from a belt, but in my brain I’m seeing it could work. That way you don’t risk the integrity of the board. Thoughts?
11 June 2022, 11:28
Hi Caro,
I truly believe that the best way to set up a washboard is: do as you think. Experiment, see what works for you. Your Velcro idea is fine if it works.
My thoughts: the one issue to be careful about is the adhesive on the self-stick Velcro, it would have to be strong enough to keep the Velcro firmly attached without harming the surface of the wood if it was pulled off. Whether that works or not would also be dependent on the state of the wood of your vintage board; and since the wood can really be different depending on how the washboard has been used, it would be hard to say without testing.
Keep in mind though that if it does work the adhesive could very well discolor or seep into the wood over time; so when you remove it in the future you may well have lost a bit of the integrity of the board regardless. Again, hard to say without trying..
Good luck and thanks for your comment!